I came to know about this method a year back or so. This technique is developed by a wedding photographer named Ryan Brenizer when he was on his honeymoon ! ! The technique involves taking multiple pictures with a very shallow depth of field and then stitching them together using photoshop or autostitch.exe or similar tool.
I recently started trying this technique for portraits and below are 2 images that I tried so far.
First one is of my Twin niece which was taken in my home town.
Go here to view few more photos of the twins.
The second one is of my wife taken at K.Gudi jungle lodges.
I am not explaining this technique in detail here as there is already a good article by Richard Bui here
You can also visit Ryan's blog here
In the blog above, example images were taken using 85 mm f/1.4 lens which gives a very shallow depth of field. Since I don't have such expensive lens, I instead tried using Nikon 50mm f/1.8 lens and results were satisfying enough.
Photography, Linux & More..
Tuesday, April 19, 2011
Wednesday, February 2, 2011
Light Paiting, Stencils & More
Light painting caught my attention some years back but I didn't not do much experiments with it for a long time. But recently it caught my attention again and this time I tried out different types /styles of light painting.
So What is Light Painting ?
According to Wikipedia light painting is a photographic technique in which exposures are made usually at night or in a darkened room by moving a hand-held light source or by moving the camera.
In Simple terms to do light painting, you fix your digital camera onto a tripod, put it in bulb mode, press and hold the shutter release button and let some one move a source of light in front of the camera in whatever style/way they want in a relatively dark room/area.
Below are some of my earlier tries at light paintings ( very basic & simple though ).
To make a light painting we need following things.
1. A Digital camera with supoprt for Bulb mode ( check this out to know what is bulb mode ).
2. A tripod
3. Some light source like CFL bulbs, regular or LED torch etc.
Note: If you are not taking any ones assistance, then you need a remote for shutter release.
DIY photography page has an excellent article about "how to do" light painting which you can read here. So I wont go into the details of it.
Next, lets come to light painting with stencils. I was inspired by reading a article on how to do amazing light paintings with stencils at DIY page and I wanted do something similar myself. So I took the idea from that page and created a custom version of stencil box which looked something like this.
I created the box in such a way that I can add and remove stencil sheet from the box.
All set, In a dark room I started painting light with this stencils box with different stencils. Below are some samples.
After the initial warmups, I tried some more creative light paintings like the one's below.
So in the images how do I get the colors ? To do this, I stick a tracing paper to the back of stencil and paint the different areas with different colors as shown in the images below.
Below are the links to some of the interesting light paintings I came across.
http://www.flickr.com/photos/tigtab/5299299085/
http://www.flickr.com/photos/kfinny/4137258588/
http://www.flickr.com/photos/tigtab/5299290579/
http://www.flickr.com/photos/tigtab/5268645787/
http://www.flickr.com/photos/tigtab/5053428871/
http://www.flickr.com/photos/tigtab/5066639678/
http://www.flickr.com/photos/tigtab/5042352757/
Sunday, November 8, 2009
Its beatlenut season !
This part of the year, Malnad region is busy in bealtenut/arecanut harvesting and people are busy working on it.
I had been to my home town recently and my parents were busy ( including me !) engaging in beatlenut processing. Came up with the idea of documenting the whole process in my own words :).
We make red colored beatlenut and this post only talks about one single way of processing. There are other different ways of processing and it changes from one area to the other.
Lot of manpower and effort is involved in this kind of processing. Its done mainly in Thirthahalli, Sringeri, Shimoga area of Malnad and its the most expensive one compared to other forms of beatlenut processed in areas like Sagar, South canara etc where its processed in many different ways.
My family has been doing beatlebut forming for few generations now and it was the main source of income, until me and my brother started earning few years back !
The whole processing ( the way we do ) takes lot of hardwork and effort. Will try to describe in brief all the steps involved in it.
The main harvesting season starts in October and it will go on till Jan end or early Feb every year. The steps involved in the processing are:
For this work, usually 4 persons are required, One guy who will climb the tree and take the bunches off, one guy who catches these on the ground!!!, one guy who will transport all these to the nearest motorable place in the farm and one women who will pick n collect the scattered arecanut seeds on the ground. First 2 work can be done only by skilled people and other 2 can be done by any one.
Below are some of the images from this initial work.
Now a group photo of the workers ! They are regulars in our home and come for work whenever we need.
Next step is to remove the outer shell from the core. For this work, house wives, children's come to our home in the evening.
Even people who go for work in the day time will come in the evening after 7 and they will remove the shell using a special knife will 10 or 11 in the night. Once done for evening, we will measure how much beatlenut they have removed and keep an account of it and pay them the money at the end of harvesting.
For this work many children's will come after the school, because they will earn their pocket money :) . More over this work doesn't require hard labor, its mostly like you sit on the knife table, chit chat with your friends while removing the husk :)
Once the outer husk is removed, the third step is cook this waw beatlenut in water and a red color solution. It has to be cooked for 2 to 3 hours in the solution. I don't know the exact ingredients of the red solution as we dont prepare it every year, its re-used again and again over the years ( even my dad is not sure when was that solution prepared ). :)
We start cooking it in a big metal drum at 6 in the morning and by 8:45 or 9 AM its cooked and by that time sun would have also come up.
Then we strain it from the drum and dry it in the
sun, spreading the beatlenut evenly on a mesh made out of bamboo !.
This has to be dried for atleast 5 to 6 days depending on how sunny /cloudy the days were.
Once all this is done, the final step is to separate the different variety from the lot. In our way of processing we get mainly 3 types and we call it Bette, Hasa and Idi ( Hard one, softone and single peice ). Once separated, these varieties are packed and sent to beatlebut mandies ( in shimoga and thirthalli ) and sold there.
I had been to my home town recently and my parents were busy ( including me !) engaging in beatlenut processing. Came up with the idea of documenting the whole process in my own words :).
We make red colored beatlenut and this post only talks about one single way of processing. There are other different ways of processing and it changes from one area to the other.
Lot of manpower and effort is involved in this kind of processing. Its done mainly in Thirthahalli, Sringeri, Shimoga area of Malnad and its the most expensive one compared to other forms of beatlenut processed in areas like Sagar, South canara etc where its processed in many different ways.
My family has been doing beatlebut forming for few generations now and it was the main source of income, until me and my brother started earning few years back !
The whole processing ( the way we do ) takes lot of hardwork and effort. Will try to describe in brief all the steps involved in it.
The main harvesting season starts in October and it will go on till Jan end or early Feb every year. The steps involved in the processing are:
- Plucking the arecanut bunches from the trees.
- Removing the husk ( outer shell ) and cutting the arecanut in 2 pieces.
- Cooking the arecanut in a red colored solution.
- Drying the cooked beatlenuts in the sun for 5-6 days !
- Once dried, separating different varieties from it.
For this work, usually 4 persons are required, One guy who will climb the tree and take the bunches off, one guy who catches these on the ground!!!, one guy who will transport all these to the nearest motorable place in the farm and one women who will pick n collect the scattered arecanut seeds on the ground. First 2 work can be done only by skilled people and other 2 can be done by any one.
Below are some of the images from this initial work.
Now a group photo of the workers ! They are regulars in our home and come for work whenever we need.
Next step is to remove the outer shell from the core. For this work, house wives, children's come to our home in the evening.
Even people who go for work in the day time will come in the evening after 7 and they will remove the shell using a special knife will 10 or 11 in the night. Once done for evening, we will measure how much beatlenut they have removed and keep an account of it and pay them the money at the end of harvesting.
For this work many children's will come after the school, because they will earn their pocket money :) . More over this work doesn't require hard labor, its mostly like you sit on the knife table, chit chat with your friends while removing the husk :)
Once the outer husk is removed, the third step is cook this waw beatlenut in water and a red color solution. It has to be cooked for 2 to 3 hours in the solution. I don't know the exact ingredients of the red solution as we dont prepare it every year, its re-used again and again over the years ( even my dad is not sure when was that solution prepared ). :)
We start cooking it in a big metal drum at 6 in the morning and by 8:45 or 9 AM its cooked and by that time sun would have also come up.
Then we strain it from the drum and dry it in the
sun, spreading the beatlenut evenly on a mesh made out of bamboo !.
This has to be dried for atleast 5 to 6 days depending on how sunny /cloudy the days were.
Once all this is done, the final step is to separate the different variety from the lot. In our way of processing we get mainly 3 types and we call it Bette, Hasa and Idi ( Hard one, softone and single peice ). Once separated, these varieties are packed and sent to beatlebut mandies ( in shimoga and thirthalli ) and sold there.
Sunday, October 11, 2009
Home made macro studio !
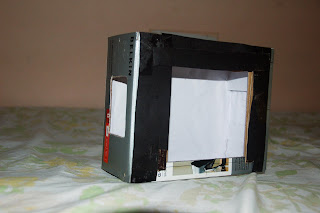
I should have written this entry long back, coz I made a macro studio kind of 2 months ago.
Anyway here it goes.
Building this macro studio will hardly costs to Rs 100 or less. For me it was Rs 100 hundred as i had to buy almost everything ! BTW I am not writing here how to do it, there is already a good article about it in strobist. Follow this link to read it .
http://strobist.blogspot.com/2006/07/how-to-diy-10-macro-photo-studio.html
One of the good thing this box apart from controlling light is, I can use many background colors by just changing the background sheet. :)
One can make use of this for product photography.
Till now I have used only white and black background. Below are some of the images taken using home made macro studio.
Also tried some smoke photography ( see below images ), but it has not come that good, will be trying more some time and post those into my flickr page
Sunday, September 13, 2009
Week End Bird Waching at TG Halli
Last week end I had been for my first ever bird watching session at TG Halli back waters near Magadi Road, Baganlore. Was there with one of my friend and his neighbor who is regular bird watcher.
It was Saturday and we decided to go early morning as chances of encountering birds are more at that time. I left home at around 5:50 and was picked up by Nitesh at Vijayanagar bus stop. Along with Nitesh, Raju, his room mate and Sharma were there. I am meeting Sharma for the first time and its because of him we were going for bird watching. as he is been doing bird watching for a long time now :). Thanks to him for taking us there.
We reached there within 30 mins or so and Sharma straight away jumped into shooting with his Canon 400 mm lens ! but me and Nitesh took some time to get into it. We were shooting some landscape and since we had tripod I was taking some shots for creating HRD image. Once we were all done with that, we went behind Sharma for the actual bird watching. Got lot of tips from Sharma about bird watching and how to approach for taking a picture and how patient one has to be when it comes to bird photography. It was good learning for us. Sharma started bird watching around 2 years back and has gained lot of knowledge about birds. He could identify all the birds we saw on that day with their names and also gave us a brief description about them ! Even if I mug up those names its very hard to remember those names again !. I am poor at remembering those names you see ;)
With all the tips we got from Sharma, we started taking pictures, we waited, we crawled on the ground, we hide ourselves behind bushes .. uff now I know how difficult it is to take bird's pictures and how much patience one requires ! ! . Other difficulty I had was my lens, firstly it was 300 mm which means I have to go further close to birds to get a picture and my Sigma lens is too slow focusing ! it creeps a lot and motor makes lot of noise :(
With whatever I had, these are the few decent pics that I could manage to take.
Also took some pics of Dragon flies and bugs ! which came out well :)
From TG Halli back waters we headed straight to Machinabele Dam, it was not for bird watching but just for view of the dam as we had not seen the dam before. I managed to click some HDR images of the dam landscape !
One more landscape from the place
And finally we headed back to Bangalore via Ramangara, as Machinabele is around 10 Kms from Ramangar. We took a group photo near Ramanagar with the famous sholay rocks as the back drop ( Sholay was shot in Ramanagara ).
It was a nice trip with lot of learning and lot of new things too !
Wednesday, March 18, 2009
Wubi initramfs problem !
Not so long back I came to know about the Wubi installer which started getting shipped with Ubuntu Live CD. I wanted to try it some time but never got a chance as I already have Ubuntu installation on a separate partition in my laptop.
Few weeks ago, I got a spare Desktop running Vista and tried the Wubi by installing Ubuntu within Windows partition by allocating 10GB for installation. The installation process was very user friendly and it went smooth and my Ubuntu was running fine for many days, until one day, when I booted onto Ubuntu it gave a strange error and gave me BusyBox initramfs prompt !!
Ooops, I was totally unaware of this and did some googling to find a solution for this, but got none! Yesterday I booted my machine onto the Vista, and saw that it was not shut down properly last time, then I shut it down properly and rebooted onto Ubuntu and to my surprise everything started working back as usual ! ! !
Friday, February 6, 2009
Blogging add-ons for firefox
Recently I came across these 2 cool add-on's for firefox which helps one blog easily and gives more control over editing a blog.
I am using the one of these add-on's currently to write this blog.
1. ScribeFire
ScribeFire is a add-on which lets you compose/edit your blogs in a separate editor within firefox. Installation and configuration is quiet easy.
Install ScribFire from http://www.scribefire.com/ and restart the firefox.
a. Open Scribe window from firefox from Tools->ScribeFire or press F8.
b. Below is the snapshot of the main Scribe Editor window.
c. To setup you blog account, click on "Add" button under Blogs tag. Enter your blogs URL and click Next.
e. In the next window enter your blooger account username and passowrd and you are ready to go.
Its a full fledged editor. its easy to format text, insert picture, add video into the blog etc.
2. Zemanta - Improve the way you blog & write e-mails
Zemanta is another add-on for Firefox, which helps you add links, photos and hot topics easily into your blog as well as mail !. Zemanta watches for keywords in your text body and presents photos from sites like flickr, info from Wikipedia, headlines from around the world ! It support many blog applications like blogger, wordpress etc and Gmail and Yahoo! Mail are currently supported.
Install zemanta from https://addons.mozilla.org/en-US/firefox/addons/policy/0/7571/39747
Subscribe to:
Posts (Atom)